Halloween Makeup: Bride of Chucky

Halloween is the one time of year I’m able to get ridiculously creative with special effects makeup.  Last year for 2012, we won a costume contest by going as a Zombie Doctor and a Nurse with a zombie bite.  Believe it or not, the open zombie wounds were not prosthetics.  They were actually created using liquid latex, toilet paper and makeup.  I thoroughly enjoyed creating these looks and couldn’t wait to try something new for the next Halloween!

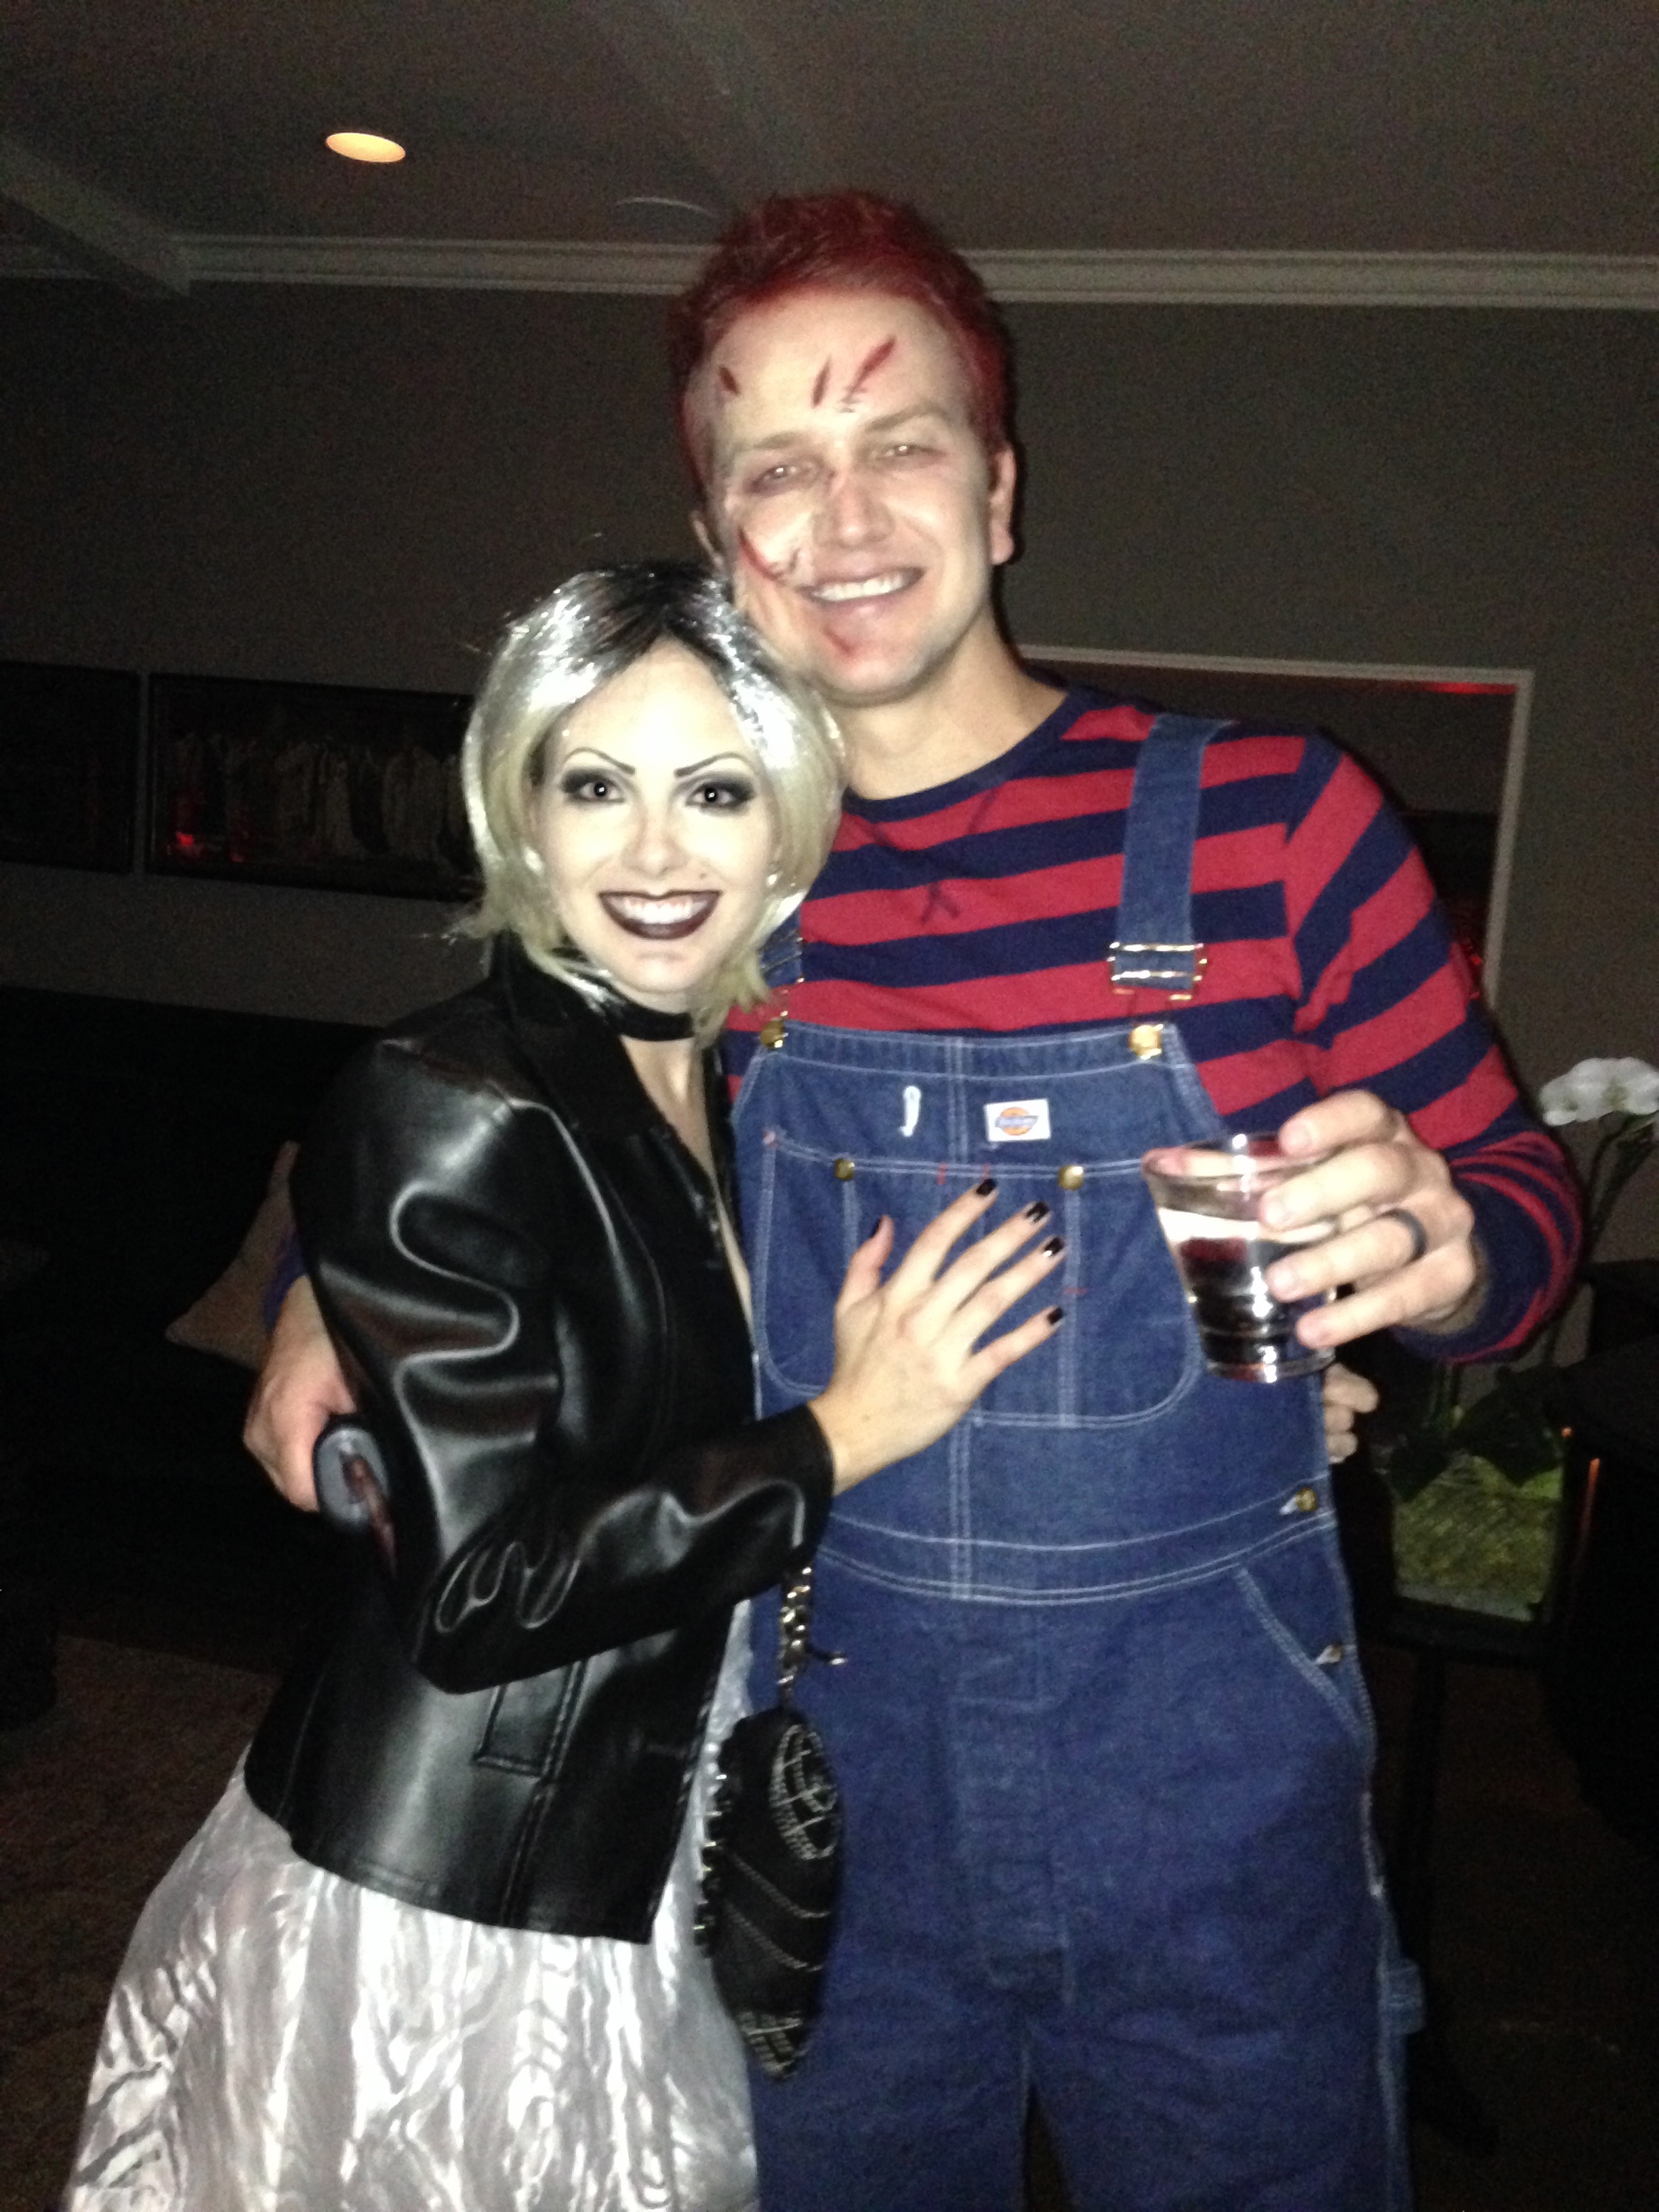
For this year, there was no costume contest, but we still had to live up to everyone’s expectations and try to at least match if not beat last year’s costumes.  The theme for the 2013 party was “Dressed to Kill.” Ooooh…I do LOVE a good theme! It took quite a bit of brainstorming, but we finally decided to dress up as Chucky and the Bride of Chucky.  How do you think we did?

Chucky & Bride Comparison

Here’s another photo of our full-length costumes…

Halloween 2013

Last year, I spent more of an effort on my hubby’s makeup than my own, so this year I spent more time on my own makeup.  The detail of my makeup that took the most effort was changing the shapes of my eyebrows to make them look drawn-on like the doll’s eyebrows for the Bride of Chucky.   I had to cover my eyebrows using a glue stick to help smooth them down.  Unfortunately, my eyebrows are rather coarse and thick, which made it quite a process to fully smooth them down.  But all-in-all, I think they turned out fairly well considering that it was my first time ever covering my eyebrows to apply makeup over them.  Once my eyebrows were smoothed over with the glue stick, I then applied foundation and lots of concealer to fully cover my eyebrows and blend them in with my skintone and the rest of my complexion makeup.  Next, I set everything with several layers of a loose translucent powder and  applied bronzer to contour.  Then I drew on my eyebrows and applied my eye makeup along with two sets of lashes – one for my upper lashline and another for my lower lashline.  I completed the look with a beauty mark before applying my lipliner, lipstick and wig.

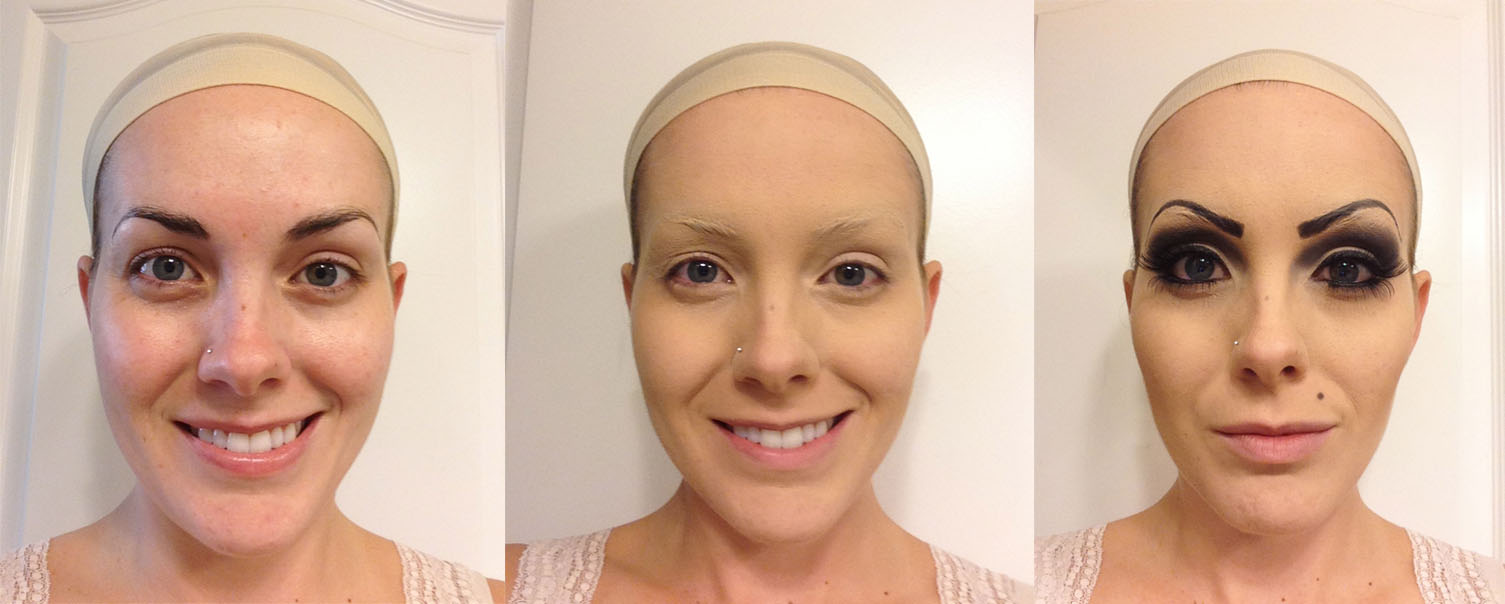
You can see the process below.  The first photo is with just my wig cap and no makeup (my eyebrows have been smoothed over with a glue stick).  The second photo is with my eyebrows covered and my complexion makeup applied (i.e. foundation, concealer and setting powder).  Lastly is a photo of my eyebrows applied with eye makeup, top and bottom lashes and a beauty mark.

Halloween Makeup Process

And here’s a close-up of the finished look with my wig on and my lips completed:

Bride of Chucky Makeup

Happy Bride

Recently on Sat., Sept. 28th, I worked my biggest wedding to date with a total of 11 people plus the Bride for makeup services! Thank goodness I had my Assistant to help! I did makeup for 7 while my Assistant took care of the other 5.  Needless to say, it was a long day.  And even though the schedule that had already been revised 4 times was thrown out at the last minute when the Bride decided to move some people around, everything actually turned out fabulous! Here’s a pic of the happy Bride & Groom…

ImageWhen I later asked the Bride how her wedding was and if everyone was happy with their makeup, this was her response:

“Everything was amazing!  It was such a great day.  Everyone absolutely loved their makeup and we all got so many compliments on it.  I can’t tell you how many people said my makeup was ‘flawless.’  You were fabulous!  My whole family has already said how excited they are to call you for future events.”

That’s what I want to hear!!! And as if her wonderful email wasn’t enough, she also wrote a fantastic 5-star Yelp review for me (yay!):

“Briana did my makeup for both my engagement photos and my wedding and she was absolutely fantastic!  I cannot say enough wonderful things about her!  Not only is she unbelievably professional (courteous, prompt and extremely organized), but she is also unbelievably talented.  She really listened to what I wanted and made it happen, and she did the same for each of my bridesmaids.  I truly have never had so many people tell me how flawless my makeup looked.  I cannot wait to have Briana do my makeup again for many more events in the future!”

People think I just show up and do makeup, but there’s A LOT more involved with weddings! This Bride booked me nearly a year in advance.  Within that time, I can’t tell you how many emails we sent back and forth about the contract, schedule and details.  So much planning!

However, getting this kind of a response and review make it so worth it!!! I love what I do, but it’s not about me, it’s about my clients and what they want.  Their happiness is the entire purpose of what I do and strive for.  It’s all for them.   But at the same time, it’s definitely nice to be appreciated!

Easy Smokey Eye Tutorial

I’ve had countless women ask me how to create a smokey eye, so I decided to show you how! But I like to use a super easy technique where I transition from an everyday look into a more dramatic smokey eye.  In just a few easy steps, you can go from blah to WOW!!! Don’t be scared of the smokey eye! It lets you get messy while still looking fabulous! Watch my tutorial to see what I mean…

Eyeliners: Decisions, Decisions

There are countless different eyeliners on the market.  How do you decide which one to use? I’ve created a Pros & Cons chart of the basic types of eyeliners to help you determine which one is best for you…

Image

Feel free to leave comments with any additional Pros and/or Cons you can think of.  Also, what’s your favorite eyeliner and why (type, brand, color, etc)?

How to Apply False Lashes

If you’re going to attempt to apply false lashes on yourself, make sure you Practice, Practice, Practice! My best advice for putting lashes on yourself is to:

1) Tilt your head back and look down into the mirror (if you look straight on, they’ll end up in your crease), and…

2) Make sure you let the glue dry for a few seconds to get it tacky before trying to stick the lashes to your lid (if the glue is too wet, it’ll go everywhere and you’ll make a mess).

Also, with any false lashes, start applying the lashes from the outer corner (trim the lashes if you need to so that they don’t poke your inner corner).  To see how to apply lashes step-by-step, watch my video tutorial: False Eyelashes Tutorial!

As far as level of difficulty, corner (or half) lashes are typically the easiest to apply , then full strip lashes, and finally, individual lashes are the most difficult because you have to be very precise in their application.  My favorite lashes to use are Ardell’s Demi Wispies for dramatic or #100 for natural.

Don’t be intimidated by applying false lashes! They’ll come off eventually (when you want them to).  Just be sure not to pull your own eyelashes when pulling the false lashes off.  Start from the outer corner and pull inwards and away.  It also helps if you use eye-makeup remover first (preferably an oil-based one) to loosen the glue or to remove any excess glue after your pull the lashes off.  Watch my video tutorial to see how to remove your false lashes: How to Remove False Lashes.

You’re ready to start practicing now!

Style Me Pretty Magazine Feature

Announcing Artistry by Briana’s feature in Style Me Pretty’s Best Weddings of 2011 Magazine! StyleMePretty.com publishes an annual magazine featuring the top 20 weddings out of the thousands that were submitted to their website throughout the year.  I was lucky enough to have done the makeup and hair for one of the weddings featured in Style Me Pretty’s 2011 Magazine! Such an honor! Here are the pages from the magazine for the wedding I was a part of (you can see Artistry by Briana mentioned on the last page for the Makeup & Hair):

Is Beauty Really Skin Deep?

A colleague of mine was doing some research and asked if I could give her an example of “how the ritual of beautifying [my]self, or feeling beautiful, made a difference to [me] that was more than skin deep.”  She wanted to know if there is a “defining moment for [me], whether it’s a daily routine or a significant lifetime event, where feeling beautiful on the outside changed how [I] felt on the inside?” This is what I told her:

“For me, looking good on the outside, makes me feel good on the inside.  Beauty = confidence.  When you feel that you look good, you actually feel better and people will be drawn to you.  People are attracted to confidence and attractiveness.  Beauty shouldn’t be a feminist issue.  Women should work with what they have and use it to their advantage.  And it’s not just about makeup, it’s about taking care of yourself.  If I go a couple of days without shaving my legs, I feel so much sexier when I finally do shave them.  I might even show them off, and I might have an extra bounce to my step.  Also, if I spray perfume on, I want people to be within smelling-distance of me. Whereas if I forget to put deodorant on, I don’t want anyone to get close to me.  Knowing that you made that extra effort, makes you want people to notice that you made an extra effort.  You want to be noticed.  As for makeup and hair, I feel that makeup and hair are a woman’s best accessory (that’s my motto).  We should have fun with them! When I’m getting dolled-up for an event, I don’t want to be rushed.  I want to take my time, enjoy the beautifying process and make sure every detail is the best it can be.”

How do you feel???

Makeup Brushes

Ever wonder what makeup brushes to use with what products? I get asked this question a lot, so I wanted to give a detailed answer. I also get asked if makeup brushes are vital to applying makeup or if fingers and/or sponges will work just as well. First of all, you need the right tools to achieve the “look.” The natural oils on your fingertips can break down the product, which can cause creasing. As for sponges, they absorb and waste a lot of the product. Therefore, makeup brushes are always the best option (in my opinion).

Each makeup brush serves a specific purpose though. Certain brushes are for certain makeup products. For example, synthetic brushes are designed to be used with creams or liquids. Natural bristle brushes should only be used with powders. A common myth is that “natural” means “better.” However, just because a brush has natural bristles doesn’t make it better or a higher quality than a synthetic brush.

Using a natural bristle brush with creams or liquids will most likely ruin the brush. On the other hand, you can use synthetic brushes with powder products, you just might not get the best application. Also, there are now some hybrid brushes that combine both synthetic and natural bristles. These hybrid brushes can be used for both creams/liquids and powder products. Below are photos of some of my favorite brushes with a description and what I use them for.  Scroll down to the very bottom to see how to care for your brushes.

MAC Brush #194 (synthetic bristle, used for applying creams/liquids such as concealer)

MAC Brush #217 (natural bristle, used for applying crease eye shadow or blending eye shadow)

Laura Mercier Ponytail Brush (natural bristle, also used for applying crease eye shadow or blending eye shadow, softer than MAC Brush #217)

Laura Mercier Eye Colour Brush (natural bristle, used for applying powder eye shadow)

Laura Mercier Creme Eye Colour Brush (synthetic bristle, used for applying eye shadow base or cream eye colors, looks identical to Laura Mercier Eye Colour Brush but texture is different)

Laura Mercier Corner Eye Colour Brush (natural bristle, used for applying powder eye shadow to small areas, such as applying dark eye shadow to the outer corner of the eye or light eyeshadow to the inner corner of the eye)

Laura Mercier Creme Eye Detail Brush (synthetic bristle, used for applying creme eye shadow to more defined areas, also great for smudging/blending creme/pencil eye liner)

MAC Brush #187 or Laura Mercier Finishing Brush (hybrid brush with both synthetic & natural bristles, used for powders such as shimmery cheek color and/or liquids/creams such as foundation)

Caring for your brushes is just as important as using the right brush.  You should keep your brushes clean.  There are brush cleansers you can get from beauty supply stores.   You use these by spraying them on a tissue/towel and then wiping the brush on them.  This is good to do between uses for a fast way to remove product and germs.  However, for a deep cleaning, you should wash your brushes every so often (ideally about once a week but no less than once per month).

My favorite product for cleaning brushes is Laura Mercier Brush Cleanser.  It’s great because you can spray it onto a tissue/towel and wipe the brushes on it for a click cleaning, or you can spray it on wet brushes and it’ll lather up for a deep cleaning.  You can also use your face wash to wash your brushes.   I wet my brushes, then I squeeze some of my face wash into the palm of my hand and swirl the wet brush around in the face wash.  Squeeze the remaining product out of the brush, rinse and then squeeze the remaining water out of the brush.  Now here’s the important part: You must lay your brushes FLAT to dry! Never leave the brushes standing up while they’re wet, or the water can seep in and loosen the bristles.   Take care of your brushes, and they’ll take care of you.